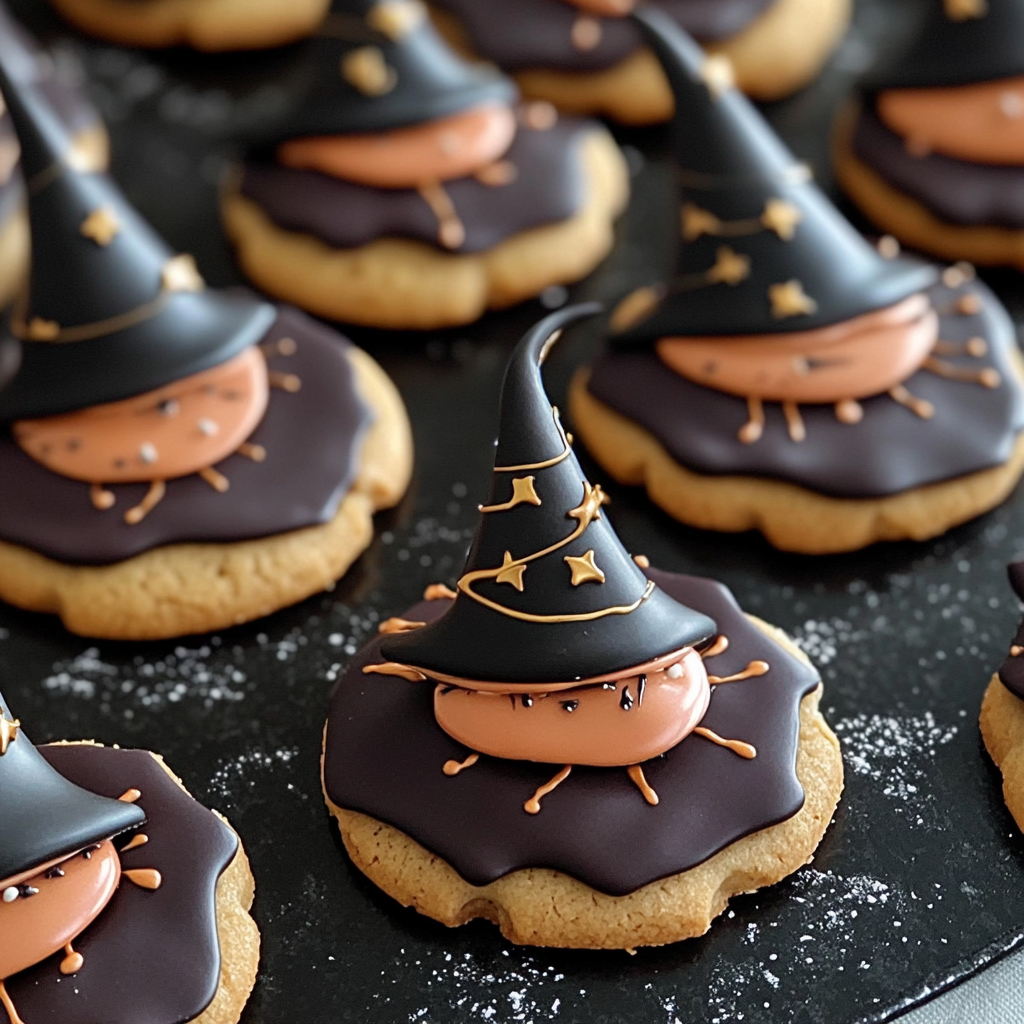
Halloween Witch Cookies
Get ready for a delightful Halloween celebration with these Halloween Witch Cookies! These adorable witch hat cookies are simple to make, making them perfect for Halloween parties, school events, or just a fun family activity. The combination of fudge-striped cookies and Hershey’s Kisses creates a treat that is not only visually appealing but also delicious. You can even customize them with colorful frosting to make your spooky creations truly unique!
Why You’ll Love This Recipe
- Easy to Make: With just three ingredients and minimal steps, these cookies come together quickly, making them ideal for last-minute treats.
- Fun for All Ages: Kids and adults alike will enjoy crafting their own witch hats, making this recipe a great family activity.
- Customizable: Add your favorite colors or decorations to the frosting for a personal touch that stands out at any gathering.
- Perfect for Parties: These festive treats are sure to be a hit at Halloween parties or gatherings, impressing guests of all ages.
- No Baking Required: Since this recipe doesn’t involve baking, you can whip up a batch in no time without worrying about the oven.
Tools and Preparation
Before diving into the fun part of creating these Halloween Witch Cookies, gather your tools to ensure a smooth process.
Essential Tools and Equipment
- Parchment paper
- Baking sheet
- Non-stick pan
- Piping bag (optional)
Importance of Each Tool
- Parchment paper: This prevents cookies from sticking and makes cleanup easy.
- Baking sheet: A sturdy base that holds your cookies while you create your spooky designs.
- Non-stick pan: Ideal for melting the chocolate on the bottom of the Hershey’s Kisses without any mess.
Ingredients
To create these delightful Halloween Witch Cookies, you’ll need:
For the Cookies
- 28 Fudge Striped Cookies
- 28 Hershey’s Kisses (unwrapped)
- Purple or Green Frosting (if desired)
How to Make Halloween Witch Cookies
Step 1: Prepare Your Workspace
Start by flipping all of the fudge-striped cookies over. Place them stripe-side down on parchment paper, wax paper, or a baking sheet to create a cute base for your witch hats.
Step 2: Melt the Chocolate
Warm a non-stick pan over medium heat. Once it’s warm, carefully touch the bottom of each Hershey Kiss to the pan just long enough for the chocolate to melt slightly.
Step 3: Assemble the Hats
Immediately place each melted Kiss on the center of each cookie over the hole in the middle. Repeat this process until all cookies are adorned with their chocolate hats.
Step 4: Add Frosting Details (Optional)
If you want to enhance your witch hats further, take some purple or green frosting and pipe a line around each Hershey Kiss. This adds an extra festive touch and makes them even more appealing!
Now your Halloween Witch Cookies are ready to be enjoyed! These treats will not only satisfy sweet cravings but also add fun and creativity to your Halloween festivities.
How to Serve Halloween Witch Cookies
Serving Halloween Witch Cookies can be a delightful experience. These spooky treats are perfect for any Halloween gathering or party and can be enjoyed in various creative ways.
Creative Serving Ideas
- Halloween-Themed Platter: Arrange the cookies on a platter decorated with fake spider webs and plastic spiders for an eerie touch.
- Gift Bags: Package individual cookies in clear bags tied with orange or black ribbons. These make great party favors for guests.
- Milk and Cookie Station: Set up a station with different types of milk (regular, almond, oat) alongside the witch cookies for a fun twist.
- Cookie Decorating Party: Invite friends over to decorate their own witch hat cookies using different colored frostings and sprinkles.
- Spooky Dessert Table: Combine these cookies with other Halloween-themed desserts like ghost cupcakes and pumpkin-shaped candies for a festive display.
How to Perfect Halloween Witch Cookies
To elevate your Halloween Witch Cookies, consider these helpful tips for achieving the best results.
- Choose Quality Cookies: Use fresh fudge striped cookies for better texture and taste. Stale cookies may not hold up well.
- Melt Chocolate Carefully: Ensure you only warm the bottom of the Hershey’s Kisses briefly to avoid burning them. This will help achieve a smooth attachment to the cookies.
- Use Piping Bags: For neat frosting lines, use piping bags instead of spreading it with a knife. This gives a more professional look.
- Experiment with Colors: Don’t hesitate to use various colors of frosting to create different themed witch hats. It adds fun and uniqueness to your treats.
- Cool Before Serving: Let the cookies sit at room temperature after decorating. This allows the chocolate to set properly before serving.
Best Side Dishes for Halloween Witch Cookies
Pairing side dishes with your Halloween Witch Cookies can enhance your spooky spread. Here are some fantastic options that complement the fun theme.
- Pumpkin Soup: A warm, creamy soup that’s perfect for fall gatherings. Serve in small cups for easy sipping.
- Mummy Dogs: Hot dogs wrapped in crescent roll dough mimicking mummies make an appetizing finger food.
- Ghostly Fruit Skewers: Use bananas and mini chocolate chips to create ghost shapes on skewers—healthy yet festive!
- Cauldron Chili: Hearty chili served in small bowls or cauldrons is a perfect savory counterbalance to sweet cookies.
- Witch’s Brew Punch: A spooky green punch made from lime sherbet and lemon-lime soda adds a refreshing drink option.
- Spider Web Dip: Layered bean dip topped with sour cream and olives creates a visually appealing dish that’s great for dipping tortilla chips.
Common Mistakes to Avoid
Making Halloween Witch Cookies can be a fun experience, but there are some common mistakes to watch out for.
- Not using the right cookies: Using cookies that don’t hold up well can lead to a messy result. Stick to fudge striped cookies for the best structure and flavor.
- Overheating the chocolate: Melting the Hershey’s Kisses too much can cause them to lose shape. Gently warm them just until they start to melt slightly.
- Skipping frosting details: Some might skip adding purple or green frosting thinking it’s unnecessary. This adds a festive touch and enhances the witch hat appearance.
- Not letting them cool properly: If you don’t allow the cookies to set after assembly, they may topple over. Ensure they cool completely before serving or storing.
- Ignoring storage tips: Improper storage can lead to stale cookies. Keep them in an airtight container at room temperature for freshness.

Storage & Reheating Instructions
Refrigerator Storage
- Store cookies in an airtight container.
- They can last for up to 5 days in the refrigerator.
Freezing Halloween Witch Cookies
- Place in a single layer on a baking sheet and freeze until solid.
- Transfer to a freezer-safe bag for up to 2 months.
Reheating Halloween Witch Cookies
- Oven: Preheat your oven to 350°F (175°C) and warm the cookies for about 5 minutes.
- Microwave: Heat one cookie at a time for about 10-15 seconds for a quick warm-up.
- Stovetop: Use a non-stick pan over low heat and warm each cookie gently, turning them occasionally.
Frequently Asked Questions
Here are some frequently asked questions about making Halloween Witch Cookies.
What are Halloween Witch Cookies?
Halloween Witch Cookies are fun, themed treats made with fudge striped cookies topped with Hershey’s Kisses, resembling witch hats.
Can I customize my Halloween Witch Cookies?
Absolutely! You can use different colored frostings or add sprinkles for extra flair. Get creative with your decorations!
How do I store leftover Halloween Witch Cookies?
Store leftover cookies in an airtight container at room temperature or refrigerate them if you want them to last longer.
How long do these cookies last?
When stored properly, Halloween Witch Cookies can last up to 5 days in the refrigerator or two months in the freezer.
Can I make these cookies ahead of time?
Yes! You can prepare the cookies ahead of time and assemble them just before serving for maximum freshness.
Final Thoughts
These Halloween Witch Cookies are not only adorable but also simple to make, making them perfect for any Halloween gathering. With their customizable options, you can easily adapt them to suit your party theme. Give these spooky treats a try and enjoy their delightful flavors!
Halloween Witch Cookies

Get ready to enchant your Halloween festivities with these delightful Halloween Witch Cookies! These whimsical treats, resembling witch hats, are a hit among kids and adults alike and make for perfect party snacks, school events, or fun family activities. Made with just three simple ingredients, they come together quickly without any baking required. The combination of fudge-striped cookies topped with melted Hershey’s Kisses creates a visually appealing and delicious treat that can be customized with colorful frosting. Let your creativity shine as you craft unique designs for your Halloween celebration!
- Prep Time: 10 minutes
- Cook Time: 0 minutes
- Total Time: 10 minutes
- Yield: 28 servings (cookies) 1x
- Category: Dessert
- Method: No-bake
- Cuisine: American
Ingredients
- 28 Fudge Striped Cookies
- 28 Hershey’s Kisses (unwrapped)
- Purple or Green Frosting (if desired)
Instructions
- Prepare your workspace by flipping the fudge-striped cookies over and placing them stripe-side down on parchment paper.
- Heat a non-stick pan over medium heat and gently melt the bottom of each Hershey Kiss by touching it to the pan.
- Assemble the witch hats by placing each melted Kiss on top of the cookie’s center.
- If using frosting, pipe a line around each Kiss to add festive flair.
Nutrition
- Serving Size: 1 serving
- Calories: 140
- Sugar: 8g
- Sodium: 75mg
- Fat: 6g
- Saturated Fat: 3g
- Unsaturated Fat: 2g
- Trans Fat: 0g
- Carbohydrates: 20g
- Fiber: 0g
- Protein: 1g
- Cholesterol: 0mg